How To Rip PC Games

How to RIP games 
There are many people trying to learn how to RIP PC games, but have no idea how to start. I just thought i might give a small tutorial to help those to begin.

PC game RIPs can be done in two ways,

1. Ripping-off content that is not essential

2. Plain simple compression
Ripping-off content 

~~~~~~~~~~~~~~


Games contain Audios, Cinematics (Cut-scenes), Credits, Unlockables, Extras and support for other languages. Not all these are essential to play the game. Some or all of these may be removes to reduce the size of the game.

Steps (Common to all RIPs)

1. Install the game to your hard drive

2. Download and install any requires patch for the game

3. Download a working crack and apply it

4. Run the game once and verify that the crack works, also goto options and reduce all the display options to LOW (helps low end PCs run your rip)

Steps to Remove contents

If you had noticed any language options while installing the game, it means that the game has multiple language support. We may remove all othre languages that are not required except the primary language (ex. English).

1. Browse to the location of the game and search the subfolders for any files/ folders named after languages.

Note: Shortforms of languages may also be used such as En-English, Po-Polish, Es-Spanish, Ru-Russian, etc.

2. Delete all other languages but your primary language

Note 1: It is better to create a dump folder where you move all these files so that you may recover them if your game dodes not load without them.

Note 2: Run the game after deleting a set of files and make sure the game runs properly without them, if not restore those files and proceed with the next set.

3. Now search for folders named Videos/ Movies/ Art, these may conotain the cinematics (cut-scenes). Do not delete the entire folder but browse into the folder and look at the files.


4. Most modern games use a popular format called BINK, with the extension .bik for the videos. These files can be viewed and recoded using RAD game tools from http://www.radgametools.com/bnkmain.htm

5. You can also recode the cut-scenes to a lower resolution or frame rate to reduce game size without loosing the videos. (This will be covered later in advance Ripping tutorial)

6. For now you may delete all the videos or just the unnecessory ones such as credits, Intro video or developer logo.

7. Run the game to make sure the game does not pop up any error messages. If you encounter any errors at the playback of the deleted videos, you may create a black jpeg picture and encode it into a bink video using RAD video tools (more details will be published in the advance ripping tutorial).

8. Similarly look for a folder named Audio / Sounds

9. You may delete the unnecessory audio files (but make sure you do not delete any game sounds, because playing a game without sound effects will be quite DUMB).

10. Finally look for any folders named HELP or Support. These contain help files for the game which are not required while playing the game, so you may delete them too

11. Now that we have removed the extra content, let us proceed to COMPRESSING the game files to reduce size

Steps to Compress game files

Let me cover the basic compression alone now. More detailed compression for specific file types will be covered in my later posts.

Things needed:


Step 1

1. Open UHARC_GUI

2. Open the directory containing the files that you wish to archive.

3.Select the entire game folder

4. Select the Add Selected button

5. You can specify the name of the archive to be created at the top of this window

6. Under Compression choose ALZ-3 (Best) and enable multimedia compression

7. Under options make sure Include Subdirectories is selected and select Store relative paths

8. Select OK.


Now that we have compressed the game into a single file, let us go to the final step of making a dos installer for our RIP.

Creating a Batch file

1. Open the folder where our compressed game file is present

2. Open notepad and type the text between the horizontal lines
Quote:
_________________COPY ___ START___________________

@echo off

_________________COPY ____ END ____________________
Note: Now we need to display a message about the name of the game and the name of the ripper so for this we’ll use a command called echo
Quote:
_________________COPY ___ START___________________

echo GAME NAME

echo RIPPED BY “YOUR NAME”

echo.

echo.

echo.

echo.

pause

__________________COPY ____ END ___________________
eg 
Quote:
@echo off
color 0C
echo Ripped
echo ************************************************
echo * * By:Your Name * *
echo ***********************************************
pause
*NoTe* when viewed in cmd it looks better and spells Ripped

Note: The echo. is used to print a blank line and the pause command is used to wait for user input.

Now that we have displayed the information and recieved an input from the user, let us start extracting the compressed game files.


Then add
Quote:
_________________COPY ___ START___________________

uharc.exe x -y+ FILENAME.uha nul
cls

___________________COPY ____ END __________________
E.g 
Quote:
@echo off
color 0C
echo Ripped
echo ************************************************
echo * * By:Your Name * *
echo ***********************************************
pause
echo Ripped
echo ************************************************
echo * * By:Your Name * *
echo ***********************************************
uharc.exe x -y+ FILENAME.uha nul
cls
You Can Also Add Some Options

Copy To Program Files

At The End Of Your Batch Add 
Quote:
cls
echo Do You Wish To Copy YourGAME To Program Files? Yes (Y) or No (N)....
SET /P M=
IF %M%==y GOTO copy
IF %M%==n GOTO finish


After that Add This 

Quote:
:copy
del FILENAME.uha nul
del UHARC.exe nul
xcopy /E /Y "*.*" "C:\Program files\" nul
copy /E /Y "*.*" "E:\Program files\" nul
copy /E /Y "*.*" "F:\Program files\" nul
Del "*.*"nul
Echo.
echo.
echo Copy Complete
echo.
echo.
pausenul
goto finish
:finish

Some Cool Looking Things For UR Batch 

Quote:
Exracting... ²²²²²²²²²²²²²²²²²²²² 1%%
Exracting... ÛÛÛ²²²²²²²²²²²²²²²²² 13%%
Option To Delete Or Not

Quote:
echo Delete Files After Install? YES (Y) Or NO (N)
SET /P M=
IF %M%==y GOTO start1
IF %M%==n GOTO start2
pausenul


Start One Will Have the Same Batch Exept after 

Quote:
uharc.exe x -y+ FILENAME.uha nul
add
Del FILENAME.uha nul


****NOTE****

Before The Word NUL goes The Symbol Above On Your Full Stop Button That Looks Like an Arrow in a way -- Next to the ? symbol Asta Wont Show The Symbol


Where FILENAME is the name of the file that you just compressed.

Now save the notepad file as SETUP.BAT in the same folder as your compressed game.

Copy the uharc.exe file to the same folder for compression using uharc_gui respectively.

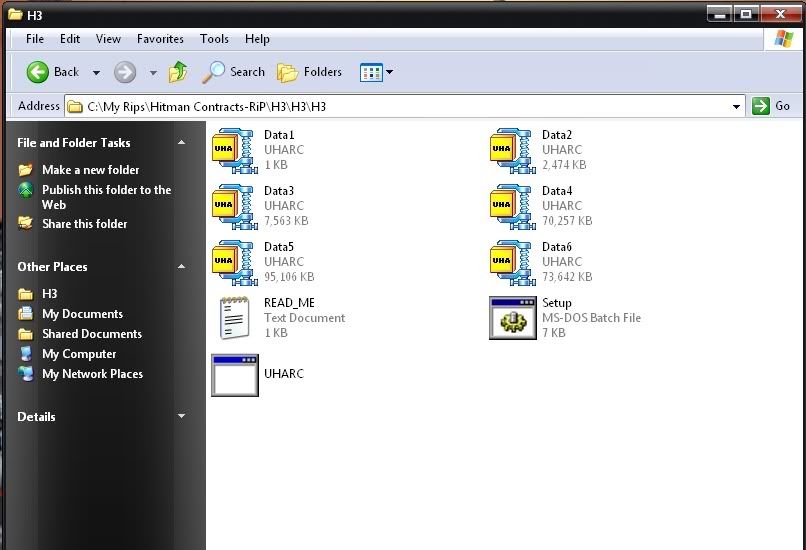
It should look Somthing like this ---- Except u should only have 1 .uha folder


Now the game has been successfully Ripped. Rename the folder to the game’s name. Burn the folder containing the Compressed game, SETUP.bat and the compressor exe file to a CD / DVD .

Now you have a just created a game RIP.

Installing your RIP


1. Copy the RIPPED game folder to your hard drive

2. Open the folder

3. Run SETUP.bat

4. Press any key to begin setup

5. After install has completed, run the game exe file from the folder 

Voice Chat and Video Chat ON Facebook

Tired of using same old Facebook chat feature to chat with your Facebook Friends??? If you have Microphone and Webcam, you can start Video chatting with your friends, just like you do with your Yahoo Messenger friends.

The new Vivox voice chat system for Facebook will allow any user to start a conversation with anyone on their friends list.

Vivox Voice allows you to video chat with your friends on Facebook. It is very easy to use application. All you have to do is add this app to your account and then download the Vivox Web Voice plugin.
The person you want to chat with should also be using this application then only you can chat with him/her.

Download Application:

How to set up Internet Connection Sharing (Windows XP Computers)

How to set up Internet Connection Sharing (Windows XP Computers)
Before you begin:

  • The 'Host' computer is the system that will be connecting to the Internet; 'Client' refers to any computer that is sharing the Internet connection, and is connecting to the Host computer.
  • You may need to disable or configure any firewall(s) to ensure that they are not interfering with your Network.
  • This Tutorial assumes that your Networks Physical Setup is already in place and fully operational.
  • You should be aware that for every concurrent Internet Connection, your Internet Speed will be markedly decreased -- therefore if you are using 56k Dial-up, your Internet will become very slow with too many Client computers connected.

First, ensure that your LAN is setup properly for ICS:
On the 
HOST PC, please run the Network Setup Wizard:
  • Goto Start --> Programs --> Accessories --> CommunicationsNetwork Setup Wizard. -->
  • The first thing to do when the wizard appears is read the welcome message, and then click Next.
  • Read the 'Before you continue....' message, and then click Next.
  • Select the option This computer connects directly to the Internet. The other computers on my network connect through this computer, and then press Next.
  • Now, type in a Description for your computer; ie: Host Computer.
  • Enter a Computer Name (or leave it as it's Default), and then press Next.
  • Enter a Workgroup Name -- or leave it as it's default, and then press Next.
  • If you want to share files and/or your printer with other computers on the network, select the option Turn on file and printer sharing and press Next.
  • Check the information; if it is all fine, press Next.

On the 
CLIENT PC(s), please run the Network Setup Wizard:
  • Goto Start --> Programs --> Accessories --> CommunicationsNetwork Setup Wizard. -->
  • The first thing to do when the wizard appears is read the welcome message, and then click Next.
  • Read the 'Before you continue....' message, and then click Next.
  • Select the option This computer connects to the Internet through a residential gateway or another computer on my network, and then press Next.
  • Now, type in a Description for your computer; ie: Client1 Computer.
  • Enter a Computer Name (or leave it as it's Default), and then press Next.
  • Enter the same Workgroup Name that you used on the HOST Next. computer, and then press
  • If you want to share files and/or your printer with other computers on the network, select the option Turn on file and printer sharing and press Next.
  • Check the information; if it is all fine, press Next.
  • Now, if possible, you should Create a Network Setup Disk -- once you have created a Network Setup Disk, insert it into any other computer on your network that you intend to use as a Client and run it; follow all prompts. If you cannot create a Network Setup Disk, then repeat the above steps on all Client PC's, however ensure that you give each Client computer a unique name; ie: Client1, Client2, Client3 etc..

Your LAN should now be configured properly; it is now time to setup ICS.
On the 
HOST PC, please do the following:
  • Open the Network Connections window (Start --> Programs --> Accessories -->Communications --> Network Connections).Internet Connection Here, you should have at least two connections listed: one for your , and one for the Ethernet adapter connected to your Local Area Network (LAN).
Right-click the connection icon corresponding to your Internet Connection and selectProperties.
  • Choose the Advanced tab, and turn on the Allow other network users to connect through this computers Internet connection option when you're done. option. Click OK
  • Verify that Internet Connection Sharing is enabled; it should say Enabled, Sharedin the Network Connections window.
  • You should now be able to access the Internet by connecting the Host computer to your Service Provider -- Client computers do not need to connect; simply open upInternet Explorer and you should be able to browse. If you are unable to connect to Internet Explorer on the Client computers, ensure that the Host computer has an active connection to the Internet.

uTorrent Configuration - To achieve maximum speed

Follow these instructions carefully to achieve max speed / performance while downloading torrents.


  1. Set the Incoming port to higher than 45000, I have found that 47532 is a nice selection.
  2. Then make sure you set the max upload speed to at least half of your connection upload speed (this will ensure faster downloading) because high upload speeds are the main cause for slow downloads.
  3. Do not use randomized port on every startup, as this will have problems with your firewall and this is highly unnecessary.
  4. Choose the correct number of maximum connections, too much connections can slow down your torrent download speed instead of speeding them up. For best results use uTorrent's speed guide found on Options >Speed Guide, and it will suggest you the best settings. For users with a max upload speed of 256 Kbits/s uTorrent suggeests 35 connections per torrent and 60 in total. Check the total speed guide for your type of connection here.
  5. Run as few torrents as possible, this means that your connection can handle and deliver maximum speed for the running torrents. I suggest running 2 torrents if you have a 256 Kbits/s upload speed connection and 1 torrent at a time if you have a 128 Kbits/s upload connection.
  6. When selecting from similar torrents select from the best seeds/peers ratio as well as swarm speed. Here is a guide on how a perfect torrent should be.
  7. If you are using a DSL router then enable port forwarding in your router. If you are using a DSL Modem this is unnecessary.
  8. Enable UPnP Port Mapping And NAT-PMP Port Mapping, (found on Options > Preferences > Connection. If you are manually forwarding your port than keep it UNCHECKED, but if you don't know what port forwarding is or you?re not forwarding the port manually than CHECK it.
  9. Do not use windows firewall, windows firewall simply hates torrents and you will have a truckload of speed problems with it. Disable it permanantly, and use a secure firewall such as Comodo Firewall or Eset.
  10. Manage your upload slots per torrent, usually it should be 2-3 per torrent. More than that will reduce the download speed of your torrents.
  11. Increase the Net.max_Halfopen Connections to 50-60 in uTorrent Advanced configaration panel, there is also a patch for windows XP to increase this limit. In Windows XP increase the limit to 100 connections.
  12. Enable the following, they greatly improve your download speed.

Update Kaspersky Offline

Follow the simple steps to download Updates : 
Step 1 : Visit this Website

and download latest KLUpdater.zip from there as it contains the GUI interface also. 

Step2 : Once you downloaded KLUpdater.zip , Just extract the files in a Folder. 

Step 3 : Now you will get extracted files, Now run the KasperskyUpdater.exe. 

Step 5 : Now the Kaspersky Window will be appeared . Select the specific product for which you want to download the updates. 

Step 6: Check the boxes which I marked in the figure and select appropriate product. Once done . click on Apply and then press Start to start the downloading process. 

Step 7 : Downloading files will be start and a Command prompt will pop up and will show the status. All the required update files will be now downloaded to the folder “Updates 

Thats it. Once done, now you have the off-line 
update for that product of kaspersky which you have selected. 

How to use this downloaded files to update your Kaspersky product ?? 

* Right click on system tray icon of the Kaspersky Antivirus. 
* Select the Update menu and click Settings . 
* Click the Add menu, and find the location of the folder containing the update file above (download the Updates folder above) 
* After added, remove the check for “Kaspersky Lab’s update server” and click OK. 
* DONE.

Make Firefox Faster

1. Type "about:config" into the address bar and hit return. Scroll
down and look for the following entries:

network.http.pipelining
network.http.proxy.pipelining
network.http.pipelining.maxrequests


Normally the browser will make one request to a web page at a time.
When you enable pipelining it will make several at once, which really
speeds up page loading.

2. Alter the entries as follows:

Set "network.http.pipelining" to "true"

Set "network.http.proxy.pipelining" to "true"

Set "network.http.pipelining.maxrequests" to any number around 5-12. This
means it will make X requests at once, depending on the number you put in.

NOTE: A recommended number is either 8 or 12.

3. Lastly right-click anywhere and select New > Integer.
Name it "nglayout.initialpaint.delay" and set its value to "0".
This value is the amount of time the browser waits before it acts on information it recieves.

If you're using a broadband connection you'll load pages 2-3 times faster now.

IMPORTANT: Some small sites may block your connection because it DOES take up more bandwidth than usual. Take note.

All windows XP commands

* CONTROL: opens the control panel window
* CONTROL ADMINTOOLS: opens the administrative tools
* CONTROL KEYBOARD: opens keyboard properties
* CONTROL COLOUR: opens display properties.Appearance tab
* CONTROL FOLDERS: opens folder options
* CONTROL FONTS: opens font policy management
* CONTROL INTERNATIONAL or INTL.CPL: opens Regional and Language option
* CONTROL MOUSE or MAIN.CPL: opens mouse properties
* CONTROL USERPASSWORDS: opens User Accounts editor
* CONTROL USERPASSWORDS2 or NETPLWIZ: User account access restrictions
* CONTROL PRINTERS: opens faxes and printers available
* APPWIZ.CPL: opens Add or Remove programs utility tool
* OPTIONALFEATURES: opens Add or Remove Windows component utility
* DESK.CPL: opens display properties. Themes tab
* HDWWIZ.CPL: opens add hardware wizard
* IRPROPS.CPL: infrared utility tool
* JOY.CP: opens game controllers settings
* MMSYS.CPL: opens Sound and Audio device Properties. Volume tab
* SYSDM.CPL: opens System properties
* TELEPHON.CPL: Opens phone and Modem options
* TIMEDATE.CPL: Date and Time properties
* WSCUI.CPL: opens Windows Security Center
* ACCESS.CPL: opens Accessibility Options
* WUAUCPL.CPL: opens Automatic Updates
* POWERCFG.CPL: opens Power Options Properties
* AZMAN.MSC: opens authorisation management utility tool
* CERTMGR.MSC: opens certificate management tool
* COMPMGMT.MSC: opens the Computer management tool
* COMEXP.MSC or DCOMCNFG: opens the Computer Services management tool
* DEVMGMT.MSC: opens Device Manager
* EVENTVWR or EVENTVWR.MSC: opens Event Viewer
* FSMGMT.MSC: opens Shared Folders
* NAPCLCFG.MSC: NAP Client configuration utility tool
* SERVICES.MSC: opens Service manager
* TASKSCHD.MSC or CONTROL SCHEDTASKS: opens Schedule Tasks manager
* GPEDIT.MSC: opens Group Policy utility tool
* LUSRMGR.MSC: opens Local Users and Groups
* SECPOL.MSC: opens local security settings
* CIADV.MSC: opens indexing service
* NTMSMGR.MSC: removable storage manager
* NTMSOPRQ.MSC: removable storage operator requests
* WMIMGMT.MSC: opens (WMI) Window Management Instrumentation
* PERFMON or PERFMON.MSC: opens the Performance monitor
* MMC: opens empty Console
* MDSCHED: opens memory diagnostics tools
* DXDIAG: opens DirectX diagnostics tools
* ODBCAD32: opens ODBC Data source Administrator
* REGEDIT or REGEDT32: opens Registry Editor
* DRWTSN32: opens Dr. Watson
* VERIFIER: opens Driver Verifier Manager
* CLICONFG: opens SQL Server Client Network Utility
* UTILMAN: opens Utility Manager
* COLORCPL: opens color management
* CREDWIZ: back up and recovery tool for user passwords
* MOBSYNC: opens Synchronization center
* MSCONFIG: opens System Configuration Utility
* SYSEDIT: opens System Configuration Editor (careful while using this command)
* SYSKEY: Windows Account Database Security management (careful while using this command)


Windows utility and applications

* EPLORER: Opens windows Explorer
* IEXPLORER: Opens Internet explorer
* WAB: opens Contacts
* CHARMAP: opens Character Map
* WRITE: opens WordPad
* NOTEPAD: opens Notepad
* CALC: opens Calculator
* CLIPBRD: opens Clipboard Viewer-> Vista Has no ClipBoard..
* WINCHAT: opens Microsoft Chat Interface
* SOUNDRECORDER: opens sound recording tool
* DVDPLAY: run CD or DVD
* WMPLAYER: opens Windows Media Player
* MOVIEMK: Opens untitled Windows Movie Maker
* OSK: opens on-screen Keyboard
* MAGNIFY: opens Magnifier
* WINCAL: opens Calendar
* DIALER: opens phone Dialer
* EUDCEDIT: opens Private Character Editor
* NDVOL: opens the mixer volume
* RSTRUI : opens Tool System Restore (For Vista only)
* %WINDIR%\SYSTEM32\RESTORE\rstrui.exe: opens Tool System Restore (for XP only).
* MSINFO32: Opens the System Information
* MRT : launches the utility removal of malware.
* Taskmgr : Opens the Windows Task Manager
* CMD: opens a command prompt
* MIGWIZ: Opens the tool for transferring files and settings from Windows (Vista only)
* Migwiz.exe: Opens the tool for transferring files and settings from Windows (for XP only)
* SIDEBAR: Open the Windows (Vista only)
* Sigverif : Opens the tool for verification of signatures of files
* Winver : Opens the window for your Windows version
* FSQUIRT: Bluetooth Transfer Wizard
* IExpress opens the wizard for creating self-extracting archives. Tutorial HERE
* MBLCTR: opens the mobility center (Windows Vista only)
* MSRA : Opens the Windows Remote Assistance
* Mstsc : opens the tool connection Remote Desktop
* MSDT: opens the diagnostic tools and support Microsoft
* WERCON: opens the reporting tool and solutions to problems (for Vista only)
* WINDOWSANYTIMEUPGRADE: Enables the upgrade of Windows Vista
* WINWORD : opens Word (if installed)
* PRINTBRMUI : Opens migration wizard printer (Vista only)


Disk management

* DISKMGMT.MSC: opens disk management utility
* CLEANMGR: opens disk drive clean up utility
* DFRG.MSC: opens disk defragmenter
* CHKDSK: complete analysis of disk partition
* DISKPART: disk partitioning tool


Connection management

* IPCONFIG: list the configuration of IP addresses on your PC (for more information type IPCONFIG/? in the CMD menu)
* INETCPL.CPL: opens internet properties
* FIREWALL.CPL: opens windows firewall
* NETSETUP.CPL: opens network setup wizard


Miscellaneous commands

* JAVAWS: View the cover of JAVA software (if installed)
* AC3FILTER.CPL: Opens the properties AC3 Filter (if installed)
* FIREFOX: Mozilla launches Firefox (if installed)
* NETPROJ: allow or not connecting to a network projector (For Vista only)
* LOGOFF: closes the current session
* SHUTDOWN: shut down Windows
* SHUTDOWN-A: to interrupt Windows shutdown
* %WINDIR% or %SYSTEMROOT%: opens the Windows installation
* %PROGRAMFILES%: Opens the folder where you installed other programs (Program Files)
* %USERPROFILE%: opens the profile of the user currently logged
* %HOMEDRIVE%: opens the browser on the partition or the operating system is installed
* %HOMEPATH%: opens the currently logged user C: \ Documents and Settings \ [username]
* %TEMP%: opens the temporary folder
* VSP1CLN: deletes the cache for installation of the service pack 1 for Vista


CMD Prompt!

* System File Checker (Requires Windows CD if the cache is not available):
o SFC / scannow: immediately scans all system files and repairs damaged files
o SFC / VERIFYONLY: scans only those files system
o SFC / Scanfil = "name and file path": scans the specified file, and repaired if damaged
o SFC / VERIFYFILE = "name and file path": Scans only the file specified
o SFC / scanonce: scans the system files on the next restart
o SFC / REVERT: return the initial configuration (For more information, type SFC /? In the command prompt CMD